
lefty-2000
Blender and the Unforgiven
It was not until I came in contact with Sexymaria and "The Movies Group" here on Deviant Art that I became interested in blender. It took awhile to get up the courage to tackle blender because I had heard that it was user unfriendly and unforgiving. I would imagine that any persistent user of "The Movies" at some point is tempted to get into modding and with the help of the tutorials on Sexymaria's web-site I was able to learn enough about blender to get hooked. I have learned a lot in the past eight years, but I have not mastered it and I know I never will.
One of the most frustrating aspects of Blender is the interface, which always keeps changing, and when you get into the world of materials and textures, there are many traps you can fall into. One reason for this is that this user tends to do things by rote without really understanding what's going on under the hood. If something doesn't work, I just keep trying things until suddenly, miraculously, the thing works and I am not really sure why. I suspect that I am not alone in this.
I am writing this journal to document the solution to a problem I had that has been frustrating me for some time. I have solved the problem in the past, but when I attempt to accomplish the same thing months or even years later, I have to resort to the same old cut and try method to do it again.
The problem came up when I was trying to create a gravel road scene in blender 279b using assets imported from The Movies. I began by creating a grassy plain which was just a plane mesh with a grass texture applied. That was easy. The next step was to create a road tile using a gravel texture extracted from the game. The gravel texture has an alpha channel so that it will blend in nicely with the background. So I created the plane mesh for the road tile, unwrapped it added the gravel texture image and turned on the transparency flags in the materials tab, but when I rendered the tile, the alpha transparency did not work. I had done this before, but my cut and try procedure did not work this time. I was forgetting something, but I could not figure out what it was.
Eventually, I did stumble onto the answer, but this time I decided to find precisely what was causing the problem I was having. The problem was in my head. When you use textures in blender, you need to create a material and apply a texture to it. A mesh object can have multiple materials, and a material can have multiple textures. When you apply a texture, all you are doing is telling the material the name of the file which contains the image. The "texture slot" is not the texture and the default properties of the texture slot are not necessarily set to the desired values when you create a new texture. When you create a texture slot in a new material, and give it a file name for the texture, you have not told the material how to use that texture image.
If you want to use the alpha channel of the texture, you must set the "influence properties" in the texture tab. When you create the texture slot, the influence properties color and alpha are set to default values. Color is set to enabled and alpha is set to disabled. If you want to use the alpha channel, you must enable the alpha property in the "influence" section of the texture properties. If you do not, the alpha channel will be ignored.
The following settings are defaulted to off when you create the material and texture slot so you have to do them manually every time to apply a texture with an alpha channel.
On materials tab: transparency: enabled, alpha : 0.0
On texture tab in the Image section: use_alpha: enabled
On texture tab in the Influence section: Diffuse Alpha checked with value of 1.0
It all makes sense once you understand what the function of the texture slot is.
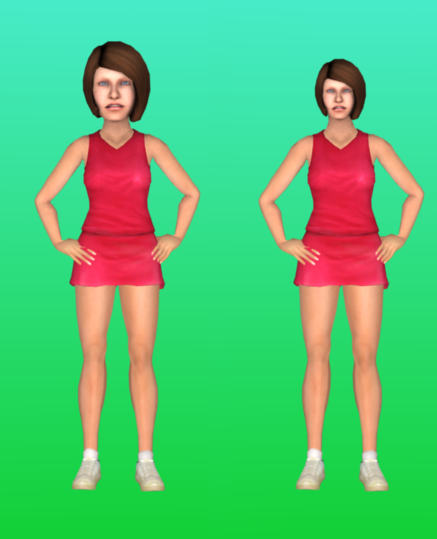
Cartoonists working in certain genres usually draw their characters with larger than life heads. I was curious to see if there was an easy way to achieve the same effect in Blender using a character imported from "The Movies Game." It turns out that all you have to do is scale up the 'head' bone in the armature and you can get something like the figure above.
On the right, the non-scaled figure is included for comparison. Even after re-scaling, the poses and expressions created from regular figures still seem to work. This means that you can still do animations with such a figure and even lip syncing, if you were willing to put in the effort.
I recently reported on a problem I was having with The Movies, i.e., that set mods had mysteriously quit working, first on windows 10, then on my windows 8 machine. IMA-Ouima told me that he had not experienced any problems with running the game on a windows XP machine, so I looked around to see if I could get my hands on a refurbished computer with XP installed. I eventually bought one from an outfit called JSC Computers.
The computer was a Dell Optiflex. It came with a new keyboard and mouse, but no video cable. All the video cables I found in my parts drawer were HDMI, so I had to order a VGA video cable before I could try my new acquisition. When I turned it on, it booted up okay and everything seemed to be working. For old times' sake I played a game of freecell, which was a favorite of mine in the XP days (I won!).
The next step was to install "The Movies" and the "Stunts and Effects" upgrade from CD. That took awhile, but I eventually got the game running in full screen mode and all appeared to be in order. I used regedit to configure the game to run in a 1200 x 900 which I find more convenient when installing modds.
On windows 10, I copied Sexymaria's medieval library set mod to a thumb drive and then plugged it into the windows XP machine. Alas, the XP machine was not able to read the thumb drive. I tried using the XP machine to reformat the drive, but it gave me an error message. I tried reformatting the drive on Win 10 and changing the file structure from exFAT to NTFS, but that didn't work.
I tried everything I could think of. I needed a convenient way to move data onto the XP machine other than a CD or DVD. The XP machine did not have WIFI, all it has is an ethernet connection, but that was not acceptable for various reasons. So I gave up.
The next morning however, I started rummaging around in my parts drawer and found a couple of very old thumb drives. I tried them in the XP machine and they worked okay. I used one of the drives to copy the Medieval Library set over to the XP machine and installed it. When I tested the mod in the game, all was well. The set appeared and the lightmaps were working.
The final test was to actually make a short video clip and export it. That test appeared to go okay. I was able to play back my video and see my actors walk into the medieval library, have a brief mumbling conversation, and walk out, with "Fresh Sneakers" playing in the background. With that, I am consoled by the thought that, if I decide to trying making a movie in TM again, it is now possible.
It is my intention to keep this machine for TM only. It will not be connected to the internet, there is no chance of a windows update, and no viruses will descend on it. In closing, it felt as comforting as a warm blanket to be back in windows XP again after all these years. The machine is clean and has nothing on it but "The Movies" and it responds as quickly as the crack of a whip.
Progress is a great thing, I suppose, but for all that is gained, much is lost.
Updated 12/25/2023:
The USB flash drive problem I experienced occurred for RAOYI drives only and only on the windows XP machine. Everything else I have seems to work okay on everything.
Utility Python Scripts for TM Characters
There are certain operations that I find myself performing over and over ad nauseum, so I have started automating these procedures with python scripts. Here is a list of the scripts that I have created so far:
left_grasp.py
right_grasp.py
tm_export_expression.py
tm_import_expression.py
tm_export_pose.py
tm_import_pose.py
The first two scripts were written to pose the thumb and fingers of the character to hold a sword or a spear. The data for the pose is embedded in the code. To use these scripts, you simply select the armature object of the character and run the script in a text window. The script does not create key frames, so to make sure the pose sticks, you will need to set a keyframe for it. The only bones affected are the bones in the hand.
The next two scripts deal with expressions. Creating an expression in blender takes some work. You need to move the facebones around to pose the lips, teeth, and eyes. The third script in the list, tm_export_expression.py, allows you to save your face pose in a text file. Give the file a revealing name such as "smile" or "frown" or "blink" for the eyes. The script saves the location of all the face bones, so once you have created your expression file, it is a good idea to go back and delete the entries in the file that are at their rest position = (0,0,0).
To re-use the expression, select the armature (make it the active object), and invoke tm_import_expression. The script does not keyframe the expression pose, so to make sure it sticks, you should set the keyframes.
The expression scripts, when run in a text window, perform no action other than registering the function on the file menu under export and import, respectively. To use them, select the armature and then invoke them from the "file" menu. If you want these utilities to be a permanent part of your tool box, place the scripts in the "startup" folder.
After I had completed the first four scripts, it occurred to me that it would be a good idea to be able to save a pose in a file and then reload it. One way to do this without using any scripts would be to save the blend and then append it to the scene where you want to use it. You can then copy the pose from the original character to any other character in the scene.
However, I decided to simplify the process a bit with a pair of specialized python utilities.
When I am creating a scene in blender using assets from The Movies (TM), a computer game by Lionhead Studios (RIP), my go to source for character poses are the animation files (*.anm). Let us say you have a character set up in blender complete with a costume and actor head, but you need a natural looking pose. In my experience, it is better to use a pose from the game when applicabler rather than to create one from scratch because that latter can take a long time and can be very frustrating. What I generally do is try different animation files looking for a frame that looks appropriate for the scene and select a frame from the animation that works best for my purpose.
The tm_export_pose and tm_import_pose scripts operate, at least for now, only on the rotation data and do not affect the face bones or the control bones locations.
The expression scripts, 3 and 4, are configured to be run at startup so they are always available on the file menu. However, the others are not. The proliferation of utility scripts could get out of hand so it might not be a good idea to put everyone into your blender environment as a permanent tool.
The most recent scripts for poses are intended to be run in a text window. They can be added to the file menu, but first the test call should be commented out along with the "unregister" line in the class execute function. They can then be placed in the blender startup folder so they will be executed at load time and these functions will be added to the file menu without invoking the file selector until you are ready.
At this point, I have not decided which way to go with these scripts. Whether or not to make them permanently available depends on how often you expect to use them. If they are infrequently used, it might be best to load them into the blender scene when you need them and run them in the text window than to clutter up the menus with scripts that do small jobs.
Set Mods Not Working in The Movies Game
When I first started working with "The Movies" I was using a Windows 8 machine from Dell. The Movies ran okay on that machine and I was able to install set Mods and they worked as intended. Later, I bought a Windows 10 machine and migrated everything to the new computer. "The Movies" worked fine and all of the set mods I installed worked fine.
A little over a year ago, I noticed that my set mods had quit working on the windows 10 computer, but they still were working on the windows 8 machine. That was a situation I could live with, I decided, since I was not making any movies lately. I figured I could always
go back to the older computer if I decided to make a new movie with TM.
Recently, however, I discovered that the set mods had quit working on the windows 8 machine as well as the windows 10 machine.
Let me explain what I mean by "not working." The modified sets appear in the menus, but when you try to load them in the advanced movie maker, they do not appear. You see your actors walking around in a featureless blue void. The game behaves as if it cannot "see" the set meshes in the meshes folder.
By trial and error, I discovered that if I renamed the set mesh and updated the set.ini file to point to the renamed mesh file, the set would appear in the game. However, this revealed another problem: The light-maps did not work with this configuration. Apparently the naming convention is crucial to getting the game engine to locate all the files it needs.

Figure 1: This is a frame from a movie I made when the set mods were working over a year ago.

Figure 2: This the same frame when I re-shot the same movie recently with the workaround.
Sadly, there appears to be no solution to this problem. As long as I stick to the basic game sets, scenes render nicely. I can make the mods work somewhat by renaming the mesh files, but so far I have not been able to get the light-maps to work so there is a noticeable decline in quality.
I posted about my problem on the Spanish Movies site. I did get a suggestion to convert the set into a prop. That might solve the problem, but I have not figured out how to do that. I think if you do that, the animations, like the door opening when a person enters a room, might not work.
It is getting harder and harder to keep this old program working.